3.4. Hello World Widget Development
This quick tutorial demonstrates how to create a simple Hello World widget for Makahiki.
The following sections provide a step by step guide to developing a new widget for Makahiki. These sections document the actual steps taken to develop the Hello World Widget.
3.4.1. Create a local installation
The first step in theme development is to follow the local installation guide to create a running implementation on your computer, as documented in Local installation of Makahiki.
3.4.2. Set environment variables for theme development
To simplify theme development, it is important to set the MAKAHIKI_USE_LESS and MAKAHIKI_DEBUG environment variables to true. When this is done, you can make changes to your theme file, save it, and then simply refresh the page to see the changes.
There are a variety of ways to set these environment variables, but a convenient way is to set them in the ~/.virtualenvs/makahiki/bin/postactivate file. This way, whenever you workon makahiki, the variables will be set. Here, for example, is the contents of my postactivate file:
#!/bin/bash
# This hook is run after this virtualenv is activated.

MAKAHIKI_DATABASE_URL=postgres://makahiki:makahiki@localhost:5432/makahiki
export MAKAHIKI_DATABASE_URL

MAKAHIKI_ADMIN_INFO=admin:admin
export MAKAHIKI_ADMIN_INFO

MAKAHIKI_USE_LESS=True
export MAKAHIKI_USE_LESS

MAKAHIKI_DEBUG=True
export MAKAHIKI_DEBUG
Once you have edited this file, you will need to workon makahiki again to set these variables. To verify they are set correctly, you can do the following:
% printenv | grep MAKAHIKI
MAKAHIKI_DEBUG=True
MAKAHIKI_DATABASE_URL=postgres://makahiki:makahiki@localhost:5432/makahiki
MAKAHIKI_ADMIN_INFO=admin:admin
MAKAHIKI_USE_LESS=True
3.4.3. Create the hello world widget package
The first step to create the hello_world widget is to create the new widget package. Makahiki’s manage.py supplies an easy way to start a new widget. Simply run the following command:
% manage.py startwidget hello_world
The startwidget command will create the base files and directories necessary for building a new widge. The directory structure should look like:
hello_world/
            templates/
                      index.html
            __init__.py
            tests.py
            views.py
__init__.py describes the purpose of the widget. Edit the default description to something
like.:
"""The hello_world widget provides an simple example Makahiki widget showing
player's name, team and current point total."""
We’ll go through contents each of the rest of the files next.
3.4.4. The Widget’s User Interface index.html
Makahiki uses Django templates for the User Interface for widgets.
Let’s build a simple UI for our Hello World widget. Since we are
going to put our widget in an existing page, the widget only needs
enough html to show itself.
The startwidget command gives you the following default index.html:
<div class="content-box">
    <div class="content-box-title">
        Widget name
    </div>
    <div class="content-box-contents">
        Widget content
    </div>
</div>
Makahiki provides many different styles and CSS classes. Normally, widgets are contained in
a content-box . The context-box is a rounded, shaded box with two parts,
content-box-title, and content-box-contents. We just need to edit the index.html file
to provide the view for our widget.
Here is the template for our Hello World widget:
<div class="content-box">
      <div class="content-box-title">
          Hello World
          <a href="#" style="float: right">
              <img src="{{ STATIC_URL}}images/icons/icon-help-sm.png" width="20"
                   align="center"
                   title="Click to get help about this window"
                   onclick="toggleHelp(event, 'widget', 'hello-world'); return false;" />
          </a>
      </div>
      <div class="content-box-contents">
          Hello <em>{{ view_objects.hello_world.name }}</em>, you're in team
          <em>{{ view_objects.hello_world.team }}</em> and have
          <em>{{ view_objects.hello_world.points}}</em> points.
      </div>
</div>
Notice the link in the content-box-title it gives us a help icon that uses JavaScript to pop-up
a help dialog box. We will add the contents of the dialog later in the tutorial.
The content-box-contents is the main body of our widget showing the player’s
name, team, and points. The view gets these values from the Django template layer.
3.4.5. Providing data to the UI views.py
Makahiki has a standard way of getting data to all the widgets:
- When the player/user loads a page the
apps.pages.views.indexfunction is called. Theindexfunction determines the name of the page and creates a dictionary ofview_objects, then calls the functionsupply_view_objectswith therequest,page_nameandview_objectsdictionary. - The
supply_view_objectsfunction determines which widgets are enabled for the given page. It then loops over each and calls theirapps.widgets.<widget-name>.views.supplyfunction with the currentrequestandpage_name.
So go get the player’s name, team, and points to the Hello World
widget we need to implement the supply function. The startwidget command provides us with an
empty supply function:
"""Provides the view of the widget."""


def supply(request, page_name):
    """ supply view_objects for widget rendering."""
    _ = request
    _ = page_name
    return {}
We need to edit the return value to include the keys name, team, and
points. Let’s add those keys to the supply function:
"""Provide the view for the Hello_World widget."""


def supply(request, page_name):
    """Supply view_objects contents, which are the player name, team and points."""
    _ = request
    _ = page_name
    return {
        "name": None,
        "team": None,
        "points": None,
    }
Now how do we get the values? We can get the user who made the request from the request. Makahiki
provides a user profile that has the player’s name and team. Let’s add that information to the
supply function:
"""Provide the view for the Hello_World widget."""


def supply(request, page_name):
    """Supply view_objects contents, which are the player name, team and points."""
    _ = page_name
    profile = request.user.profile
    name = profile.name
    team = profile.team
    return {
        "name": name,
        "team": team,
        "points": None,
    }
Now how are we going to get the player’s points? Makahiki provides a score_mgr that encapsulates
scores. The function we want is players_points. Let’s take a look
at the supply function again:
"""Provide the view for the Hello_World widget."""
from apps.managers.score_mgr import score_mgr


def supply(request, page_name):
    """Supply view_objects contents, which are the player name, team and points."""
    _ = page_name
    profile = request.user.profile
    name = profile.name
    team = profile.team
    points = score_mgr.player_points(profile)
    return {
        "name": name,
        "team": team,
        "points": points,
    }
Notice: we have to import the score_mgr to be able to use it.
3.4.6. Add your widget to the installed widget apps
In order for a new widget to be available to the system, you need to edit the makahiki/settings.py file and add your widget name to the INSTALLED_WIDGET_APPS variable. Here is what this portion of the settings.py file looks like after I’ve added the new hello_world widget to it:
################################
# INSTALLED Widgets
################################
INSTALLED_WIDGET_APPS = (
  'action_feedback',
  'ask_admin',
  'badge_scoreboard',
  'badges',
  'bonus_points',
  'hello_world',
  'home',
  'resource_goal',
  'resource_goal.energy',
  'resource_goal.water',
  'energy_power_meter',
  'resource_scoreboard',
  'resource_scoreboard.energy',
  'resource_scoreboard.water',
  'my_achievements',
  'my_commitments',
  'my_info',
  'popular_tasks',
  'prizes',
  'quests',
  'raffle',
  'scoreboard',
  'participation',
  'smartgrid',
  'team_members',
  'upcoming_events',
  'wallpost',
  'help.intro',
  'help.faq',
  'help.rule',
  'status',
  'status.prizes',
  'status.rsvps',
  'status.users',
  'status.actions',
  'logging',
  'status.referrals',
  'status.wattdepot',
  'status.twitter',
  'status.badges',
  'status.DEGG',
  'status.DWGG',
  'wallpost.user_wallpost',
  'wallpost.system_wallpost',
)
In other words, add the name of your new widget to this list.
3.4.7. Add the widget to a page
Add the widget to the page in the admin interface. Go to the Admin interface, “Settings” page, and
select Page infos. It is in the Internal Admin section.
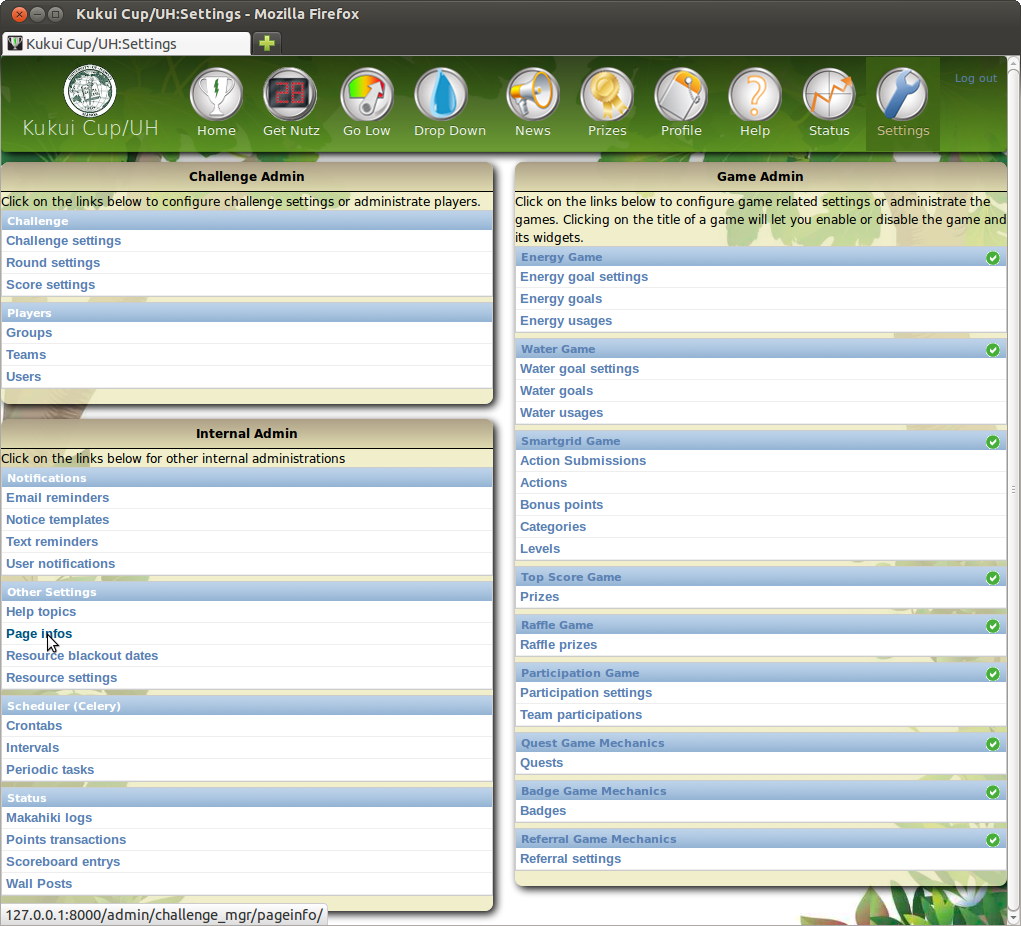
The Admin Settings Page.
Select the profile row in the Page Info page. The Page Settings section lists the
Widgets for the selected page.

The default Widgets on the Profile page.
We are going to add the hello-world widget to the left-hand location by pressing Add another
Page Setting. Then use the widget dropdown and select the hello-world widget. Leave the
Location setting on “Left”. Set the Priority to “2”. Save the profile page setting.
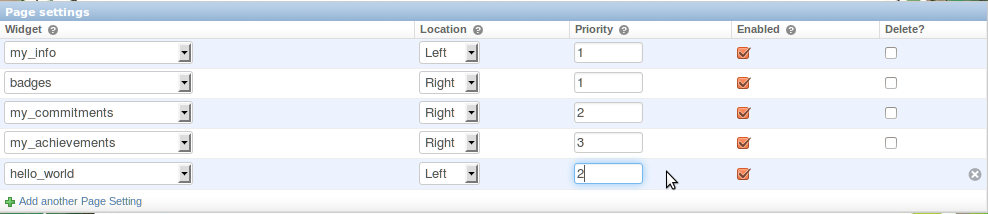
The Hello World Widget added to the Left-hand column.
Once the widget is added to the Page Settings the Game Designer may enable or disable the widget.
3.4.8. Verify your widget installation
Go to the Profile page, and see the Hello World widget.
The following figure shows a portion of the Profile page after choosing the brand new google theme:
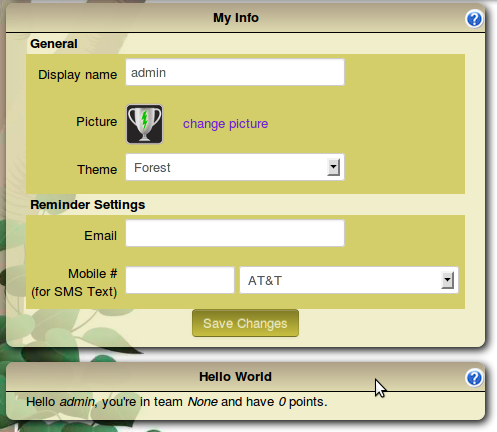
The newly installed and enabled Hello World Widget.
3.4.9. Enter the help text for the Hello World Widget
We need to add the contents of the Help Dialog for the Hello World Widget. Go back to the
Settings page and select Help topics from the Internal Admin section.
Press the “Add Help Topic” button in the upper right-hand corner.

Add New Help Topic Button.
This will bring up the Add New Help Topic page.
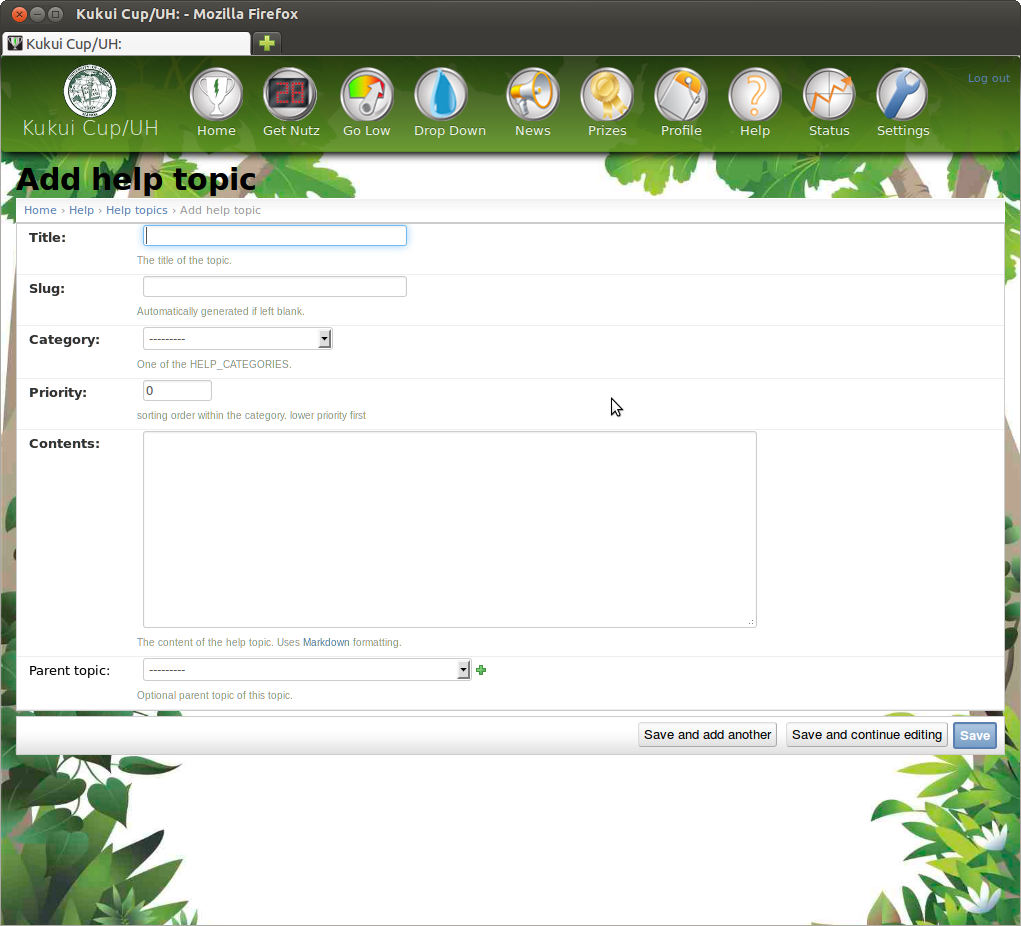
Add New Help Topic Page.
1. Enter the Title for the help topic. In our case enter “Hello World”. The form automatically fills
out the Slug field based upon the Title. The slug must match the third parameter in the
toggleHelp function call in the index.html help link.:
<img src="{{ STATIC_URL}}images/icons/icon-help-sm.png" width="20"
     align="center"
     title="Click to get help about this window"
     onclick="toggleHelp(event, 'widget', 'hello-world'); return false;" />
- Select the “Widget Help” Category from the drop down. This matches the second parameter in the
toggleHelpfunction. - Enter the Help Contents.
- Save the Help Topic.
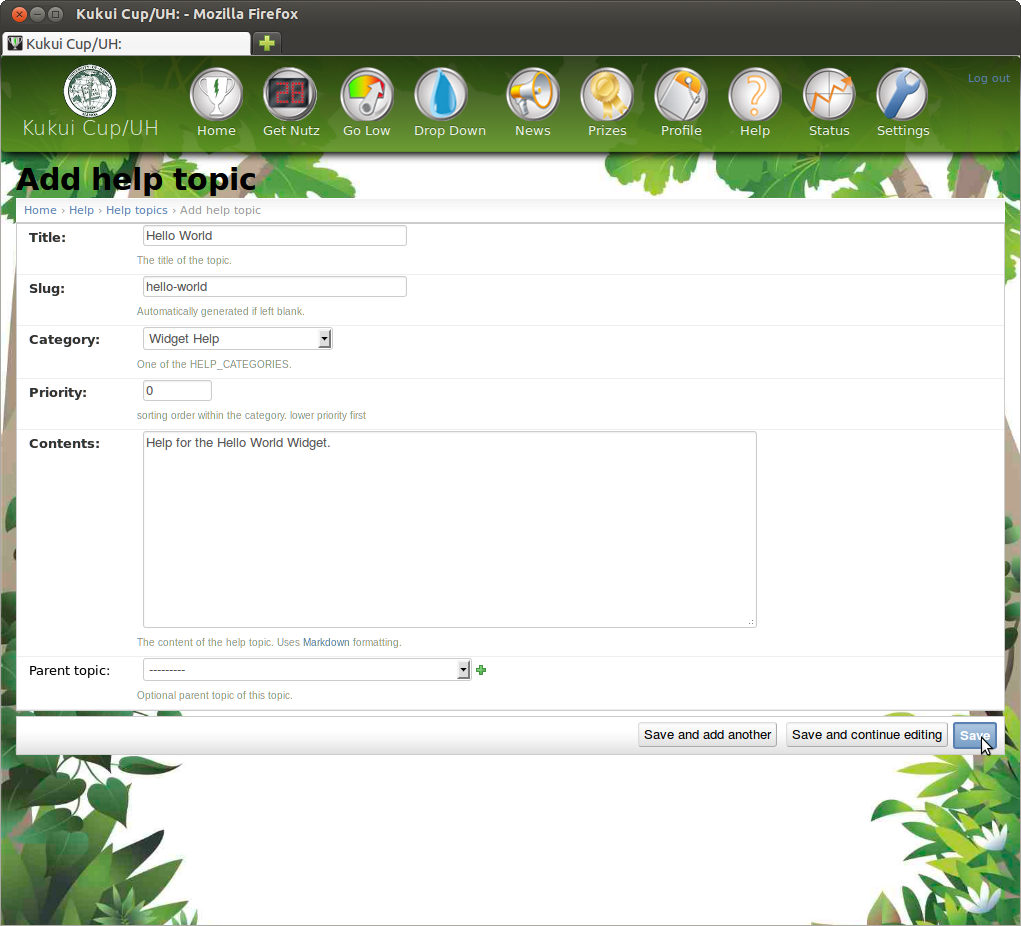
Filled out Help Topic
- Verify the Help Dialog. Go to the Profile page and click the Hello World’s help icon. You should see the help dialog box with our contents.
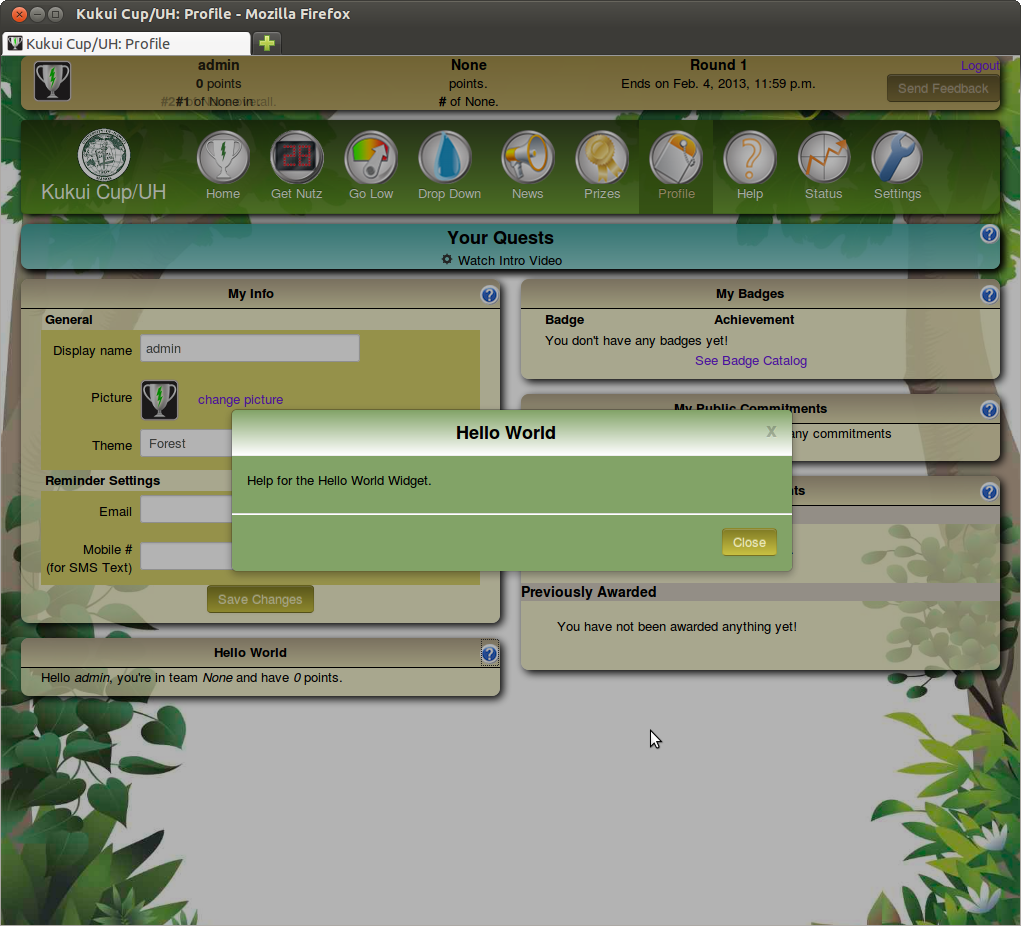
Hello World Widget Help Dialog.
3.4.10. Push your changes
The final step is to use git to add your new widget and push your changes to your GitHub repository.
The following files were modified or added during this tutorial:
- settings.py
- apps/widgets/hello_world
The changes to the database, to add the Hello World widget and Help Topic are not permanent. If you re-initialize the database the script will erase the page settings and help topic. To make the changes permanent edit “fixtures/base_pages.json” to add the page_settings item for the Hello World Widget. Here is the entry:
{
    "pk": 114,
    "model": "challenge_mgr.pagesetting",
    "fields": {
        "priority": 2,
        "widget": "hello_world",
        "enabled": true,
        "page": 8,
        "location": "Left"
    }
},
Edit “fixtures/base_help.json” to add the Hello World’s help topic. That entry looks like:
{
    "pk": 51,
    "model": "help.helptopic",
    "fields": {
        "category": "widget",
        "title": "Hello World",
        "parent_topic": null,
        "priority": 0,
        "slug": "hello-world",
        "contents": "Help for the Hello World Widget."
    }
},